1.Enabling data binding inside this android section in build.gradle, then click on sync.
dataBinding{
    enabled = true
}
2.In your layout file, wrap the layout with tags, then the system will generate a file named XXactivityBinding.
<layout xmlns:android="http://schemas.android.com/apk/res/android"
    xmlns:app="http://schemas.android.com/apk/res-auto"
    xmlns:tools="http://schemas.android.com/tools">
    <...>
</layout>
3.In the activity, declare a variable for the binding object which type is XXXactivityBinding.
private lateinit var binding:ActivityMainBinding
4.Use the setcontent view function of the DataBindingUtil and provide the activity and resource id to bind our activity and view.
binding = DataBindingUtil.setContentView(this,R.layout.activity_main)
5.Object has properties for each of these views in the xml layout file, which remove the underscores.
binding.submitButton.setOnClickListener {
	displayGreeting()
}
Note: starting from Android Gradle Plugin 4.0.0, the gradle should be written as follow:
android {
    buildFeatures{
         dataBinding = true
    }
}
-
In the xml file, add the tags. Inside data tag, create tag and add the name and type attributes. Type is the class name.
<data> <variable name="student" type="com.anushka.bindingdemo3.Student" /> </data> -
In the widget such as TextView, add the @ sign curly braces. In this curly braces, add the property of the variable.
 <TextView
     android:id="@+id/name_text"
     android:layout_width="wrap_content"
     android:layout_height="wrap_content"
     android:textSize="30sp"
     android:text="@{student.name}"
     />
NOTE:
If you need two-way binding, you need write it as follows:
android:text="@={student.name}"Usually, we use it on EditView.
-
In the activity, the binding will get a new property as the name of variable, so you can use it to update data.
binding.student = getStudent()
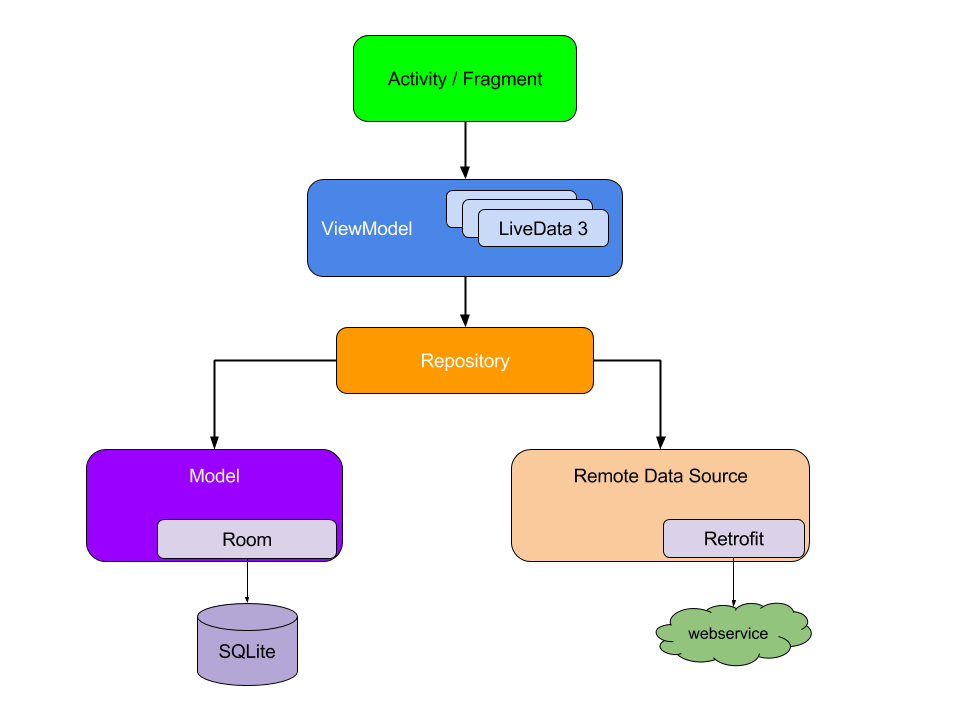
For the configuration changes, such as screen rotations, keyboard changes, language changes etc. The activity will be destroyed as well as values. The data will download for amount of times.
View model has a longer life cycle, therefore it can hold the value created by activity.
1.Open this website as follows:
https://developer.android.com/jetpack/androidx/releases/lifecycle2.Copy these dependencies into build.gradle.
def lifecycle_version = "2.3.1"
// ViewModel
implementation "androidx.lifecycle:lifecycle-viewmodel-ktx:$lifecycle_version"
// LiveData
implementation "androidx.lifecycle:lifecycle-livedata-ktx:$lifecycle_version"
3.Create a view model class extends ViewModel.
class MainActivityViewModel: ViewModel()
4.Put the variable definition into view model, and write the set and get function.
private var count: Int = 0
fun getCurrentCount(): Int{
}
fun getUpdatedCount(): Int{
}
5.Get the instance of the view model with ViewModelProvider function.
viewModel = ViewModelProvider(this).get(MainActivityViewModel::class.java)
6.Use instance of view model to assign the value to the variable.
binding.countText.text = viewModel.getCurrentCount().toString()

when the app is put into the background and the app process is killed in order to free up the system's memory.
To create a custom View Model.
-
Create a view model factory extended
ViewModelProvider.Factory,with the parameter you wanna assign for your view model.class MainActivityViewModelFactory(private val startingTotal: Int) : ViewModelProvider.Factory -
Implement the create function and judge model class can be assignable from the View Model Class, then return a View model.
if(modelClass.isAssignableFrom(MainActivityViewModel::class.java)){ return MainActivityViewModel(startingTotal) as T } -
Throw a illegal argument exception.
throw IllegalArgumentException("unknow") -
In MainActivity, create an instance of the ViewModelFactory, and pass it as the second parameter of the ViewModelProvider.
mainActivityViewModelFactory = MainActivityViewModelFactory(100)
viewModel = ViewModelProvider(this,mainActivityViewModelFactory).get(MainActivityViewModel::class.java)
LiveData is a lifecycle-aware observable data holder class. That means it can be used in the components which have the lifecycle such as activity, fragment, service.
What are the benefits of using live data. LiveData automatically updates the UI when app data changes and they clean up themselves when their associated lifecycle is destroyed.
Therefore no memory leaks or crashes will happen as a result of destroyed activities or fragments.
Data in a LiveData object are only readable, cant be edited.
-
Add dependencies in gradle.
implementation "androidx.lifecycle:lifecycle-extensions:$lifecycle_version" -
Change the attributes as the MutableLiveData.
var total = MutableLiveData<Int>() -
In the init, assign the value to init this attribute.
init { total.value = startingTotal } -
Delete the get function and assign value in set function
total.value = (total.value)?.plus(input) -
In the activity, use the observe function and implement the Observer interface.
viewModel.total.observe(this, Observer {
           binding.resultTextView.text = it.toString()
       })
In the xml bind a click function for button.
android:onClick="@{()->myViewModel.setUpdatedCount(1)}"
- In XML, bind the Live Data directly.
android:text="@{myViewModel.countData.toString()}"
- Assign the viewModel to myViewModel in Activity.
binding.myViewModel = viewModel
- Set the lifecycleOwner of binding as this.
binding.lifecycleOwner = this
- Delete the observe function of data.
Note:
If we want to provide more security to our data, If we want to encapsulate our data
we can make this variable private and create a public live data variable.
private var count = MutableLiveData<Int>()
val countData : LiveData<Int>
get() = count
android:text="@={myViewModel.username}"
-
Open this website and Add dependencies.
def nav_version = "2.3.4" // Kotlin implementation "androidx.navigation:navigation-fragment-ktx:$nav_version" implementation "androidx.navigation:navigation-ui-ktx:$nav_version" -
To add Safe Args to your project, include the following
classpathin your top levelbuild.gradlefile:buildscript { repositories { google() } dependencies { def nav_version = "2.3.4" classpath "androidx.navigation:navigation-safe-args-gradle-plugin:$nav_version" } } -
To generate Kotlin code suitable for Kotlin-only modules add:
apply plugin: "androidx.navigation.safeargs.kotlin"
-
Data binding
dataBinding{ enabled = true } -
Select the app , Right click, New, Android resource file. Select the resource type as navigation.
-
In xml, click design, drag a NavHostFragment into design and add the constrains.
-
Create destination. Double click this fragment to open it and convert into constraint layout.
-
Set data binding in onCreateView
binding = DataBindingUtil.inflate(inflater,R.layout.fragment_home,container,false) return binding.root -
Add action.
Click within the circle and drag the resulting line to the SecondFragment and release . -
Set click listener for button.
binding.button.setOnClickListener {
	it.findNavController().navigate(R.id.action_homeFragment_to_blankFragment)
}
-
In the first fragment, Create a Bundle to transform data.
val bundle = bundleOf("input" to binding.editTextTextPersonName.text.toString()) it.findNavController().navigate(R.id.action_homeFragment_to_blankFragment,bundle) -
In the second fragment, use
argumentsto get the data.var input: String? = arguments!!.getString("input")
In nav_graph, click arrow, input the animation for adding animations in design view.
Note:
if the preview cant shown, change to code mode first and add codes as follow:
xmlns:app="http://schemas.android.com/apk/res-auto" android:id="@+id/nav_graph"
 <fragment
     	...
        tools:layout="@layout/fragment_home"/>
Create data class:
data class Fruit (val name:String, val supplier: String)
  CoroutineScope(Dispatchers.IO).launch {
      downloadUserData()
  }
The coroutine will run in the Main Thread. In android we also call it UI thread.
The coroutine will run in a background thread from a shared pool of on-demand created threads.
Default dispatcher is used for CPU intensive tasks.
Unconfined Coroutine will run on the current thread, but if it is suspended and resumed, it will run on whichever thread that the suspending function is running on. It is not recommended to use this dispatcher for Android Development.
This launch is the coroutine builder. it launches a new co routine without blocking the current thread. Return an instance of Job so we can track of the coroutine to cancel it.
we cannot use this coroutine to calculate something and get the final answer as the returned value.
launches a new coroutine without blocking the current thread. Returns an instance of Deferred of type of the result.
produce a stream of elements. returns an instance of ReceiveChannel.
Will block the thread until its execution is over. Returns a result which we can directly use.
CoroutineScope(Dispatchers.IO).launch {
    val stock1 = async {
        getStock1()
    }
    val stock2 = async {
        getStock2()
    }
   val total = stock1.await() + stock2.await()
}
When you have more than one coroutines, you should always start with the Dispatchers.Main . You should always start with the CoroutineScope interface. And inside suspending functions you should use coroutineScope function which starts with the simple 'c' to provide a child scope.
coroutineScope{
    launch(IO) {
        delay(1000)
        count = 50
    }
    deferred = async(IO) {
        delay(1000)
        return@async 20
    }
}

return count + deferred.await()
Using viewModelScope to avoid memory leak.
fun getData(){
    viewModelScope.launch {

   }
}
All the coroutines in this new scope will be canceled when the Lifecycle is destroyed.
It can chose the time to lunch.
lifecycleScope.launchWhenCreated {  }
lifecycleScope.launchWhenStarted {  }
lifecycleScope.launchWhenResumed {  }
Add dependence.
implementation "androidx.lifecycle:lifecycle-livedata-ktx:$arch_version"
Usage
Inside the LiveData building block, you can use emit() function to set a value to the LiveData.
var users = liveData(Dispatchers.IO){
    val result = usersRepository.getUsers()
    emit(result)
}
In mainActivity.
mainActivityViewModel.users.observe(this, Observer { myuser ->
    myuser.forEach {
        Log.i("MyTag","name is ${it.name}")
    }
})
@Entity(tableName = "subscriber_data_table")
data class Subscriber(
    @PrimaryKey(autoGenerate = true)
    @ColumnInfo(name = "subscriber_id")
    val id: Int,
    @ColumnInfo(name = "subscriber_name")
    val name: String,
    @ColumnInfo(name = "subscriber_email")
    val email: String
) {
}
@Dao
interface SubscriberDAO {
    @Insert(onConflict = OnConflictStrategy.REPLACE)
    suspend fun insert(subscriber: Subscriber): Long
    @Update
    suspend fun update(subscriber: Subscriber)
    @Delete
    suspend fun delete(subscriber: Subscriber)
    @Query("DELETE FROM subscriber_data_table")
    suspend fun deliteAll()
    @Query("SELECT * FROM subscriber_data_table")
    fun getAllSubscribers():LiveData<List<Subscriber>>
    //this function doesn't need to do in background
}
OnConflictStrategy.REPLACE means if you insert the same entity, the newer one will replace the older one.
Need to create a singleton. Can copy this to use
@Database(entities = [Subscriber::class],version = 1)
abstract class SubscriberDataBase :RoomDatabase(){
    abstract val subscriberDAO: SubscriberDAO
    companion object{
        @Volatile
        private var INSTANCE : SubscriberDataBase? = null
            fun getInstance(context: Context): SubscriberDataBase{
                synchronized(this){
                    var instance: SubscriberDataBase? = INSTANCE
                        if(instance == null){
                            instance  = databaseBuilder(
                                context.applicationContext,
                                SubscriberDataBase::class.java,
                                "subscriber_data_database"
                            ).build()
                        }
                    return instance
                }
            }
    }
}
class SubscriberRepository(private val dao: SubscriberDAO) {
    val subscribers = dao.getAllSubscribers()
    //use suspend fun to do in background thread
    suspend fun insert(subscriber: Subscriber){
        dao.insert(subscriber)
    }
    suspend fun update(subscriber: Subscriber){
        dao.update(subscriber)
    }
    suspend fun delete(subscriber: Subscriber){
        dao.delete(subscriber)
    }
    suspend fun deleteAll(){
        dao.deliteAll()
    }
}
Design the viewModel
class SubscriberViewModel(private val repository: SubscriberRepository):ViewModel() {
    val subscribers = repository.subscribers
    val inputName = MutableLiveData<String>()
    val inputEmail = MutableLiveData<String>()
    val saveText = MutableLiveData<String>()
    val cleanText = MutableLiveData<String>()
    init {
        saveText.value = "Save"
        cleanText.value = "Clear Text"
    }
    fun update(){
        val name= inputName.value!!
        val email = inputEmail.value!!
        insert(Subscriber(0,name,email))
        inputName.value = null
        inputEmail.value = null
    }
 }
And create the viewModelFactory
class SubscriberViewModelFactory(private val repository: SubscriberRepository):ViewModelProvider.Factory{
    override fun <T : ViewModel?> create(modelClass: Class<T>): T {
        if(modelClass.isAssignableFrom(SubscriberViewModel::class.java)){
            return SubscriberViewModel(repository) as T
        }
        throw IllegalArgumentException("Unknow View Model Class")
    }
}
Set viewModel and bingding in the MainActivity
binding = DataBindingUtil.setContentView(this,R.layout.activity_main)
val dao = SubscriberDataBase.getInstance(application).subscriberDAO
val repository = SubscriberRepository(dao)
val factory = SubscriberViewModelFactory(repository)
viewModel = ViewModelProvider(this,factory).get(SubscriberViewModel::class.java)
binding.subscriberViewModel = viewModel
binding.lifecycleOwner = this
viewModel.subscribers.observe(this, Observer {
    Log.i("smx", "onCreate: ${it.toString()}")
})
Create adapter:
class MyRecyclerViewAdapter( private val clickListener: (Subscriber) -> Unit) :
    RecyclerView.Adapter<MyViewHolder>() {
    private val subscriberList  = ArrayList<Subscriber>()
    override fun onCreateViewHolder(parent: ViewGroup, viewType: Int): MyViewHolder {
        val layoutInflater = LayoutInflater.from(parent.context)
        val binding:ListItemBinding = DataBindingUtil.inflate(layoutInflater,R.layout.list_item,parent,false)
        return MyViewHolder(binding)
    }

    override fun getItemCount(): Int {
        return subscriberList.size
    }

    override fun onBindViewHolder(holder: MyViewHolder, position: Int) {
        holder.bind(subscriberList[position],clickListener)
    }
    fun setList(subscribers: List<Subscriber>): Unit {
        subscriberList.clear()
        subscriberList.addAll(subscribers)
    }
}
class MyViewHolder(val binding:ListItemBinding):RecyclerView.ViewHolder(binding.root){
    fun bind(subscriber: Subscriber, clickListener: (Subscriber) -> Unit){
        binding.nameTextView.text = subscriber.name
        binding.emailTextView.text = subscriber.email
        binding.itemLayout.setOnClickListener {
            clickListener(subscriber)
        }
    }
}
In MainActivity, set the adapter to recycleView:
class MainActivity : AppCompatActivity() {
    private lateinit var binding:ActivityMainBinding
    private lateinit var viewModel: SubscriberViewModel
    private lateinit var adapter:MyRecyclerViewAdapter
    override fun onCreate(savedInstanceState: Bundle?) {
        super.onCreate(savedInstanceState)
        binding = DataBindingUtil.setContentView(this,R.layout.activity_main)
        val dao = SubscriberDataBase.getInstance(application).subscriberDAO
        val repository = SubscriberRepository(dao)
        val factory = SubscriberViewModelFactory(repository)
        viewModel = ViewModelProvider(this,factory).get(SubscriberViewModel::class.java)
        binding.subscriberViewModel = viewModel
        binding.lifecycleOwner = this
        initAdapter()
        display()
        //binding.subscriberRecyclerView.adapter = MyRecyclerViewAdapter(viewModel.subscribers.value!!)
        viewModel.message.observe(this, Observer {
            it.getContentIfNotHandled()?.let {
                Toast.makeText(this, it, Toast.LENGTH_LONG).show()
            }
        })
    }

    private fun initAdapter() {
        binding.subscriberRecyclerView.layoutManager = LinearLayoutManager(this)
        adapter = MyRecyclerViewAdapter({selectedItem:Subscriber -> listItemClicked(selectedItem)})
        binding.subscriberRecyclerView.adapter = adapter
    }

    private fun display() {
        viewModel.subscribers.observe(this, Observer {
            adapter.setList(it)
            adapter.notifyDataSetChanged()
        })
    }

    fun listItemClicked(subscriber: Subscriber): Unit {
       viewModel.initUpdatedOrDelete(subscriber)
        Toast.makeText(this,"selected name is ${subscriber.name}",Toast.LENGTH_LONG).show()
    }
}
Use Event to control the status:
open class Event<out T>(private val content: T) {

    var hasBeenHandled = false
        private set // Allow external read but not write

    /**
     * Returns the content and prevents its use again.
     */
    fun getContentIfNotHandled(): T? {
        return if (hasBeenHandled) {
            null
        } else {
            hasBeenHandled = true
            content
        }
    }

    /**
     * Returns the content, even if it's already been handled.
     */
    fun peekContent(): T = content
}
Note:
the suspend fun in Dao file can give you a return value .
@Insert(onConflict = OnConflictStrategy.REPLACE)
suspend fun insert(subscriber: Subscriber): Long
return the rowid.
@Update
suspend fun update(subscriber: Subscriber):Int
return the number of updated rows.
@Delete
suspend fun delete(subscriber: Subscriber)
return the number of deleted rows.
val battery = Battery()
val smartPhone = SmartPhone(battery)
val smartPhone = SmartPhone(Battery())
private lateinit var smartPhoneProvider:ServiceProvider
fun setSmartPhoneProvider(serviceProvider: ServiceProvider){
    this.smartPhoneProvider = serviceProvider
}
public lateinit var smartPhoneProvider:ServiceProvider
Add dependencies.
https://developer.android.com/training/dependency-injection/dagger-android
implementation 'com.google.dagger:dagger:2.27'
kapt 'com.google.dagger:dagger-compiler:2.27'
Apply plugin
apply plugin: 'kapt'
testImplementation 'junit:junit:4.12'
// optional - Test helpers for LiveData
testImplementation "androidx.arch.core:core-testing:$arch_version"
androidTestImplementation 'androidx.test.ext:junit:1.1.2'
androidTestImplementation 'androidx.test.espresso:espresso-core:3.3.0'
// optional - Test helpers for LiveData
testImplementation "androidx.arch.core:core-testing:$arch_version"
testImplementation "com.google.truth:truth:1.1.2"
-
To generate a test class, right click on the class name. Then select generate from the menu. Then select test.
-
we are going to use is JUNIT4.
-
select test directory from this choose destination directory dialog.
-
Add @Test annotation.
@Test fun calculateCircumference_radiusGaven_returnsCorrectResult(){ } -
create an instance of MyCalc Class.
private lateinit var myCalc: MyCalc -
import the function assertThat
com.google.common.truth.Truth.assertThat
class MyCalcTest{
    private  lateinit var myCalc: MyCalc
    @Test
    fun calculateCircumference_radiusGaven_returnsCorrectResult(){
        myCalc = MyCalc()
        val result = myCalc.calculateCircumference(3.1)
        assertThat(result).isEqualTo(13.188)
    }
}
Fakes, Stubs and Mocks. A Fake is a light weight implementation class of the Interface, usually we hand code fake classes.
A stub is an object that provides predefined return values to method calls.
A mock is similar to stub, but they allows tester to set answers to method calls when writing the test case. That means In mocks we dynamically set expected return values for the method calls. Not like fakes, we usually generate stubs and mocks using a testing framework.
-
add dependences
testImplementation 'org.mockito:mockito-core:1.10.19'https://developer.android.com/training/testing/unit-testing/local-unit-tests
-
Add rule if you test the livedata
@get:Rule
var instantTaskExecutorRule = InstantTaskExecutorRule()
Whole codes:
class CalcViewModelTest{
    private lateinit var calcViewModel: CalcViewModel
    private lateinit var calculations: Calculations
    @get:Rule
    var instantTaskExecutorRule = InstantTaskExecutorRule()
    @Before
    fun setUp(){
        calculations = Mockito.mock(Calculations::class.java)
        Mockito.`when`(calculations.calculateArea(2.1)).thenReturn(13.8474)
        calcViewModel = CalcViewModel(calculations)
    }
    @Test
    fun calculateArea_radiusSent_UpdateLiveData(){
        calcViewModel.calculateArea(2.1)
        val result = calcViewModel.areaValue.value
        assertThat(result).isEqualTo("13.8474")
    }
}
Since we are testing Architecture components, To execute those tasks synchronously, We need to use InstantTaskExecutorRule.
@get:Rule
var instantTaskExecutorRule = InstantTaskExecutorRule()
Room library has a special data base builder named inMemoryDatabaseBuilder. This inMemoryDatabaseBuilder allows us to create temporary databases for testing. The database will be created in system memory, When we kill the process after testing the app, database will be removed and data will not be persisted.
@Before
fun setUp(){
    database = Room.inMemoryDatabaseBuilder(
        ApplicationProvider.getApplicationContext(),
        TMDBDatabase::class.java
    ).build()
    dao = database.movieDao()
}
close the data base after the testing is done.
@After
fun tearDown()
{
    database.close()
}
Finally, write the test function.
@Test
fun saveMoviesTest() = runBlocking {
    val movies = listOf(
        Movie(1,"o1","p1","d1","t1"),
        Movie(2,"o1","p1","d1","t2"),
        Movie(3,"o1","p1","d1","t3"),
        Movie(4,"o1","p1","d1","t4")
    )
    dao.saveMovies(movies)
    val allmovie =  dao.getMovies()
    assertThat(allmovie).isEqualTo(movies)
}
Add dependency of robolectric.
testImplementation 'org.robolectric:robolectric:4.4'
interface  NewsRepository{
    suspend fun getNewsHeadLines(): Resource<APIResponse>

    suspend fun getSearchedNews(searchQuery: String): Resource<APIResponse>

    suspend fun saveNews(article: Article)

    suspend fun deleteNews(article: Article)

    fun getSavedNews(): Flow<List<Article>>
}
class DeleteSavedNewsUseCase(private val newsRepository: NewsRepository) {
    suspend fun excute(article: Article){
        return newsRepository.deleteNews(article)
    }
}
class GetSavedNewsUseCase(private val newsRepository: NewsRepository) {
    fun excute(): Flow<List<Article>> {
        return newsRepository.getSavedNews()
    }
}
renturn flow的方法不需要标记为suspend,因为方法中的执行不需要挂起,可以很快返回结果,等到调用collect的时候才开始执行。
gradle.properties:
My_key = "178197bf827d423f990571329e6684be"
build.gradle:
defaultConfig{
  buildConfigField("String", "AKI_KEY", MY_KEY)
}
https://guides.codepath.com/android/Storing-Secret-Keys-in-Android#hidden-in-buildconfigs
interface NewsRemoteDataSource {
    suspend fun getTopHeadLines(): Response<APIResponse>
}
class NewsRemoteDataSourceImpl(
    private val newAPIService: NewAPIService,
    private val country: String,
    private val page: Int
) : NewsRemoteDataSource{
    override suspend fun getTopHeadLines(): Response<APIResponse> {
        return newAPIService.getTopHeadLines(country,page)
    }
}
class NewsRepositoryImpl(
    private val newsRemoteDataSource: NewsRemoteDataSource
): NewsRepository {
    override suspend fun getNewsHeadLines(): Resource<APIResponse> {
        return responseToResource(newsRemoteDataSource.getTopHeadLines())
    }
    private fun responseToResource(response: Response<APIResponse>): Resource<APIResponse> {
        if(response.isSuccessful){
            response.body()?.let { result->
                return Resource.Success(result)
            }
        }
        return Resource.Error(response.message())
    }
  }