How to setup your development environment
First install the Arduino IDE (NOT the Arduino Web Editor):
https://www.arduino.cc/en/Main/Software
Now you need to instal Arduino ESP32 core. Use the following instructions depending on your operating system:
Optional: Visual Studio Code
https://code.visualstudio.com/download
You can use Visual Studio Code in combination with Arduino to write your firmware on VS Code:
- Open it, go to the Marketplace, search for
Arduinoand install the extension from Microsoft. - Open user settings and configure the path to the installed Arduino IDE and the arduino starter (see https://github.com/Microsoft/vscode-arduino)
My settings are:
"arduino.path": "/home/rac/Downloads/electronics/arduino-1.8.5",
"arduino.commandPath": "arduino"
"C_Cpp.intelliSenseEngine": "Tag Parser"
arduino.json:
    {
        "sketch": "buttonWithInterrupt.ino",
        "output": "build",
        "board": "espressif:esp32:nina_w10",
        "configuration": "UploadSpeed=921600",
        "port": "/dev/ttyUSB0"
    }
c_cpp_properties.json:
{
    "configurations": [
        {
            "name": "Linux",
            "includePath": [
                "${workspaceRoot}",
                "/home/rac/Arduino/hardware/espressif/esp32/cores/esp32",
                "/home/rac/Arduino/hardware/espressif/esp32/libraries",
                "/home/rac/Downloads/electronics/arduino-1.8.5/hardware/tools",
                "/home/rac/Downloads/electronics/arduino-1.8.5/libraries",
                "/home/rac/Documents/Arduino/hardware/tools",
                "/home/rac/Documents/Arduino/libraries"
            ],
            "browse": {
                "path": [
                    "${workspaceRoot}",
                    "/home/rac/Arduino/hardware/espressif/esp32/cores/esp32",
                    "/home/rac/Arduino/hardware/espressif/esp32/libraries",
                    "/home/rac/Downloads/electronics/arduino-1.8.5/hardware/tools",
                    "/home/rac/Downloads/electronics/arduino-1.8.5/libraries",
                    "/home/rac/Documents/Arduino/hardware/tools",
                    "/home/rac/Documents/Arduino/libraries"
                ],
                "limitSymbolsToIncludedHeaders": false
            },
            "intelliSenseMode": "clang-x64",
            "cStandard": "c11",
            "cppStandard": "c++17"
        }
    ],
    "version": 4
}
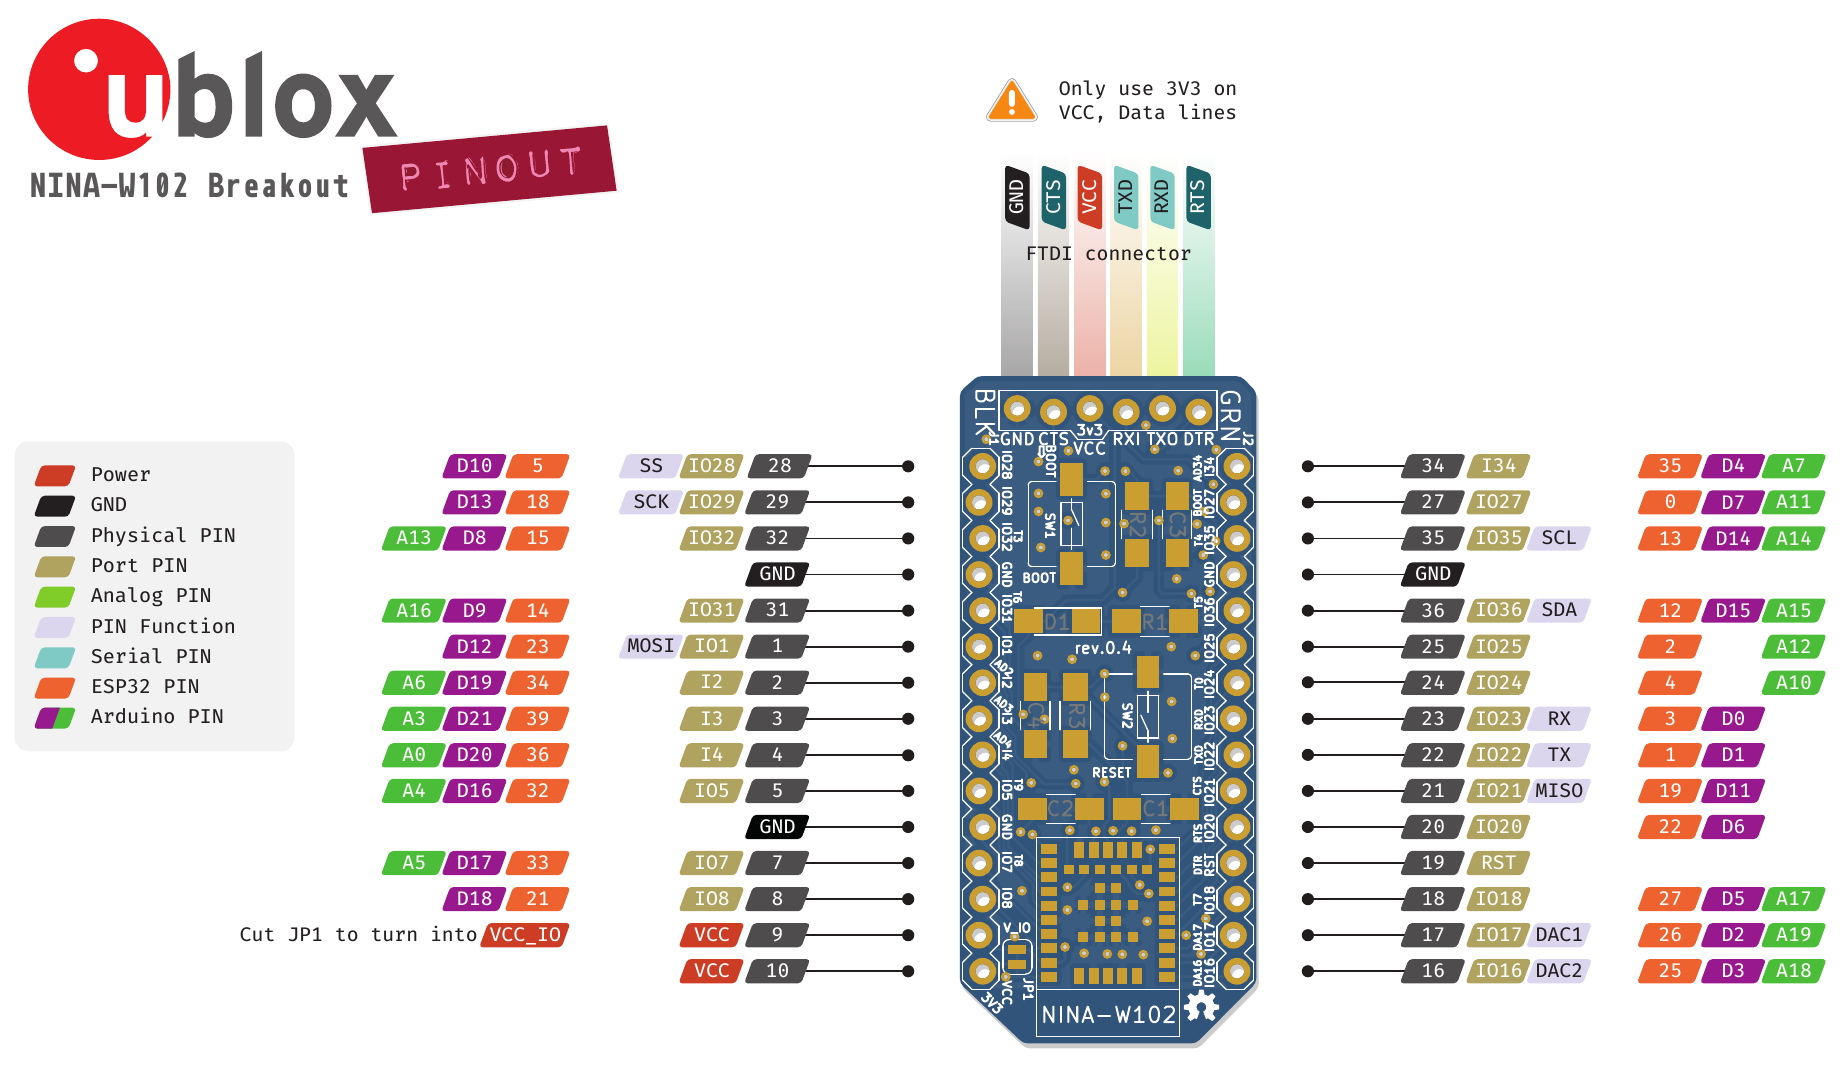
It is always useful to keep the pinout diagram at hand for reference:
There are a couple code examples which where created during firmware development of the badge. Some will work standalone on any ESP32 but might need some changes, they are only tested on the MakeZurich 2018 Badge.
You can find them @ https://github.com/rac2030/IoT-conference-badge/tree/master/firmware/examples
Now let's test our setup with the Hello World of ESPs, the WiFi Scan.
- Connect an FTDI programmer to NINA breakout (see pinout for reference on how to connect, but standard FTDI header is 1-to-1 match to the breakout header).
- Plug the FTDI programmer board to your computer.
- Open Arduino IDE.
- Open the menu
Tools > Board, and select theu-blox NINA-W10 series (ESP32). - Open the menu
Tools > Port, and select the one your board is connected to. - Leave
Tools > Upload speedshould stay at default value (921600). - Leave
Tools > Programmerwith the default (AVRISP mkII). - Open the example code: go to
File > Examples for u-blox NINA-W10 series (ESP32) > WiFi > WiFi Scan. - Click
Upload. - While the IDE is connecting to the board (
Connecting........_____....._____.), press and holdBOOTand pressRESETonce (while still holdingBOOTdepressed). - Wait until the IDE says
Done uploading. - Open the
Serial Monitorand select speed of115200 baudin the status bar. - Press the
RESETbutton on your NINA breakout. - Behold the wonders of modern world unfold in front of your eyes in the form of the wifi names of all your neighbours' networks.
- Do a little dance. 👯